
Labels Overview
Labels are a powerful tool within Doulado, serving as the foundation for several key features. When set up, they seamlessly integrate across different parts of the software, helping you stay organized and streamline your workflow.
Labels are completely customizable for your business, and being visible in the main client list allows them to be a helpful tool to organize clients and track various parts of their journey or status.
You can use labels to categorize clients by service type, track insurance details if applicable, and more. Once in place, labels unlock additional functionality in areas like lead forms and checklists.
Form fields attached to label categories provide even more customization, allowing you to capture client information in a way that best suits your practice. These fields can then be mapped directly to client profiles (profile info) for a smooth and organized experience.
To keep everything structured, you can group labels and form fields, making it even easier to manage your services efficiently.
Labels can be added and removed easily to a client's profile as they go through their journey. This fully customizable feature is designed to support your particular business(es), helping you stay focused on what matters most: caring for your clients.
Setting Up Labels, Form Fields, and Groups
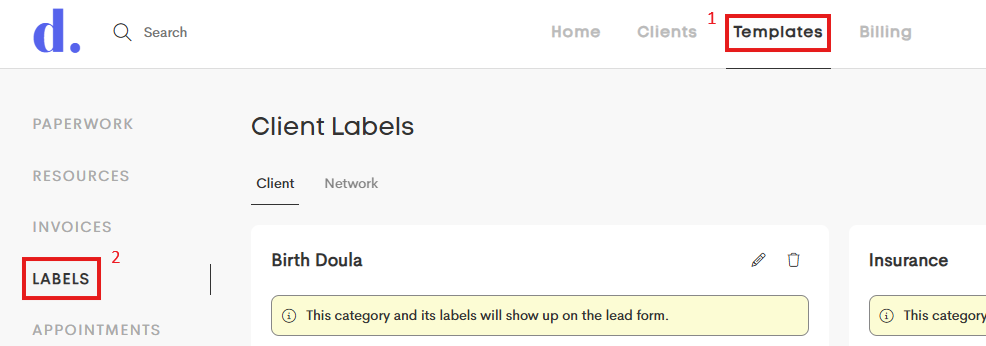
To get started, navigate to Templates > Labels. This is where you can create and manage labels, form fields, and groups to keep your services organized.
The following steps will guide you through the setup process:
Creating a New Group
- Click + New Group.

-
Add a Name to that group category.

- Select the appropriate Service Area.
- If you do not select a service area, those labels will not appear as options to add to a lead form. If you want a client to able to assign a label to themselves through a lead form, select the appropriate service area type.
- If these labels are only for internal use, and will be manually added to a profile as needed, no service area type is needed!
- Click Save.

Adding a New Label
- Click + New in the category you are working in to add another label.

- Enter the label name.
- Choose a color for easy identification.

You can also edit existing labels by clicking on them to edit the name and/or color.
Creating a New Form Field
- Click + New in the category you are working in.
- Enter the field name (ex. Provider Name, Birth Location, Emergency contact, etc.)
- Each label category can have different form fields attached to that category. You may want to have different custom fields populate in a profile depending on their label (service type).

If you’d like to include a dropdown menu for this field, enter the options in the Optional Preset box, listing each option separately. See the example below:

Managing Fields
You can easily customize the order of fields, and how they will appear in the client profile info section by managing the fields in each category by selecting manage and moving them around in the order you prefer.

Fields are organized by group, so when a label is selected for a client profile, whether through the lead form or when you manually enter the client, the fields associated with that group will automatically appear.
This setup allows you to customize how client information is captured and organized, ensuring a smooth and intuitive experience.
Some examples of categories and associated form fields can be found below. You can have multiple categories, custom colors for your business, and various form fields depending on the service type.

When form fields are edited in this section, it does not effect already created profiles.
If you add a label to an already created profile, the form fields will not automatically populate, but the names will appear in a dropdown when editing the profile info to add them if needed.
Here is a look at a client list, and how labels appear there.
As you navigate through a client journey, you can easily add or remove labels as you need. You can click on the pencil icon in the main client list, or at the top quick stats section once you open the client profile.
Additionally, you can filter your client list by label type with the filter on the top right of the list.

The information that is added into the fields goes to the profile info section of a Client Profile in the Overview page.
We often refer to this area as quick info or things you want to keep track of about a client and easily viewable in their profile. It can be "mapped to a custom field" from the lead form, or be added in when you select a label in the manual client profile creation.
This profile info is not client facing, and only visible to the doula(s) that can view this client profile.

Form fields are only added to a client profile when it is first created with the label selected. They can be edited manually per profile as you need, and changing one profile does not effect other profiles.