Inviting a client to the portal
You can decide when you'd like to invite a client to the portal depending on your preference.
-
If you are manually entering the client profile, you have the option to invite them then.
-
If you choose not to invite them during profile creation, you can manually enable their portal for them later from within their profile menu.
- If a client fills out a lead form to create their client profile, their portal access will need to be manually enabled when you are ready.


Most doulas choose to invite their clients to the portal once they are officially moving forward with that client; whether that is after contract signing, or after a successful consultation.
Clients do not need access to their portal to view and fill out paperwork, see messages, check scheduled events or receive other email notifications from Doulado.
The Client Portal can now be enabled and disabled on a per journey basis.
To invite a client to the portal requires information about the journey, and whether it's been already enabled for that journey.
- If you click on Invite to Portal within the Client Profile (previous method), it will let you know that the client portal has been enabled from the client contact card menu in the client profile.
- You can find the new Enable Client Portal in the menu where you're currently accessing the View Your Profile.
Having access to their portal gives them an easier view of paperwork, resources you've shared, their appointment list, message center and invoicing. Check out this article to see what a client portal looks like!
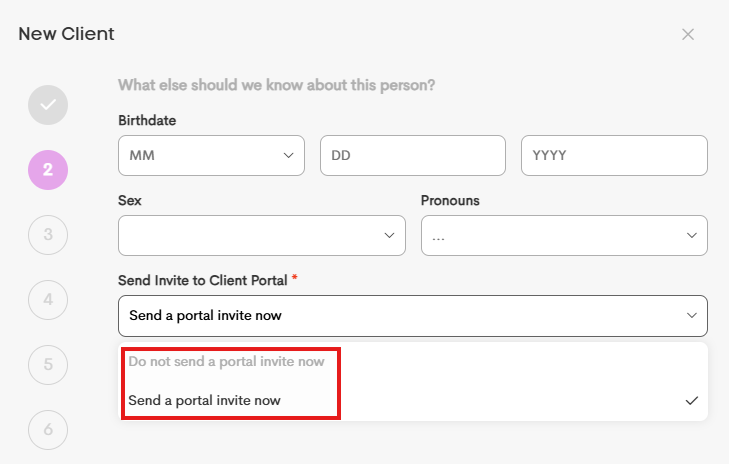
While creating the client profile
- Enter the client information, as well as an email address, which is required to send the portal invite email
- On page 2, make sure the option Send a portal invite now is selected. You can change the default option that shows here in the settings at the bottom of your client list!

Inviting to the client portal manually
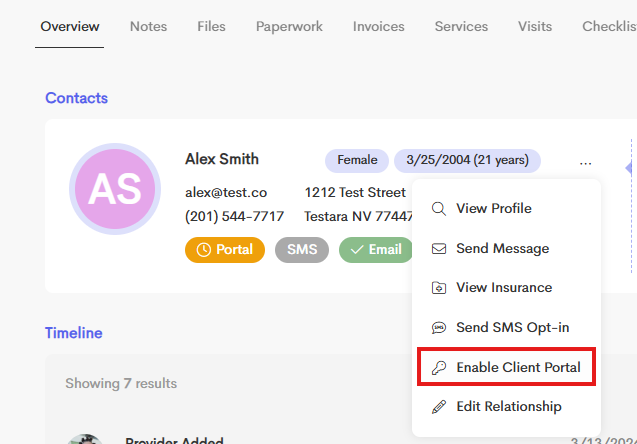
- Open the client journey profile by clicking the client row in the client list
- Click the little 3 dots to access the menu next to their contact information

- Click Enable client portal and then enable
- The client will receive an email to create their account
This is the default message sent to clients when invite to their portal. This notification can be customized in your Templates>Notifications section under "Other activity". If they click the button, it will bring them to the account onboarding link assigned to their journey!

- If the client loses the email, you can go back in and enable client portal again
- Once their client portal is created, the enable client portal will disappear from that menu
After a client creates their account via an email link from the doula, they can also login at app.doulado.co. Before they are officially invited to their client portal, they will not be able to login to Doulado.
You may see the "invite to portal" button if you view your client's profile. This message will appear if you try to invite them to the portal from there. The new adjusted way is listed above, and eventually this invite to portal button will disappear.

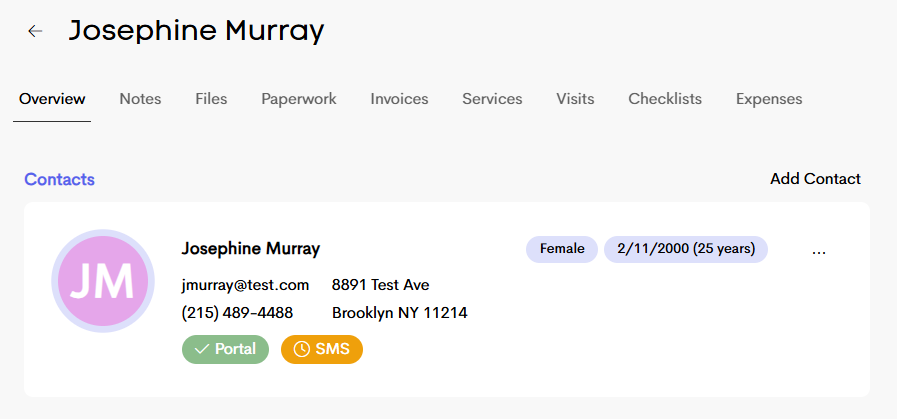
Portal Status
Within the client contact card, you can view whether a client has been invited to or has created their client portal. When an invite to create their client portal has been sent, the client's decision will now be reflected in their profile contact card.
- Gray= Not yet sent
- Orange= Sent, but pending account creation
- Green= Complete, they have signed in to their client portal